Your blog might be missing one very valuable page.
A Resources page lets you demonstrate your expertise, offer real value to your readers, bring in affiliate income, and more! (We’ll be looking at the benefits in more detail in a moment.)
So what is a Resources page?
At its simplest, it’s just a list of links to things you think your readers will find useful. Those resources could be almost anything: other blogs, podcasts, books or ebooks, physical tools, software, video or audio series … whatever you might want to recommend to someone who enjoys your blog. Some bloggers also include links to their own products on their Resources page.
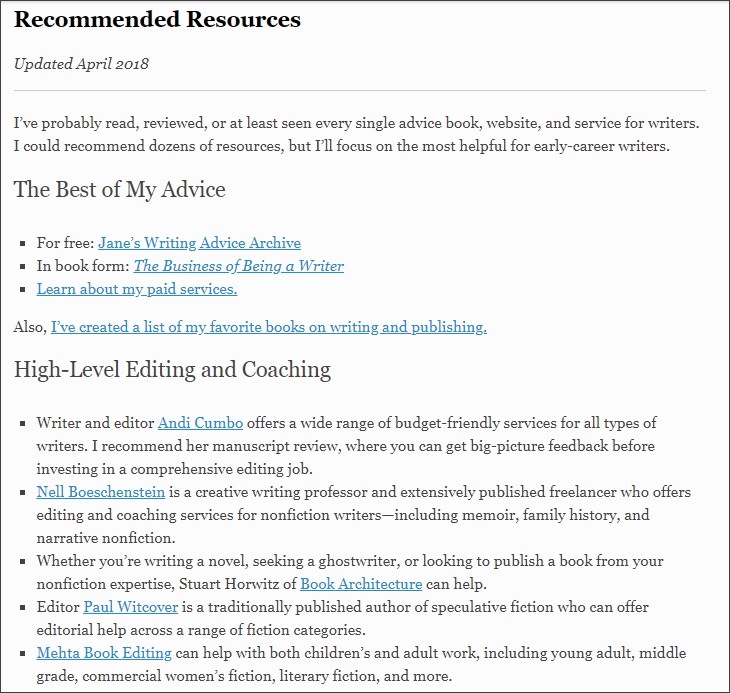
Here’s a straightforward example, from author and editor Jane Friedman’s blog:
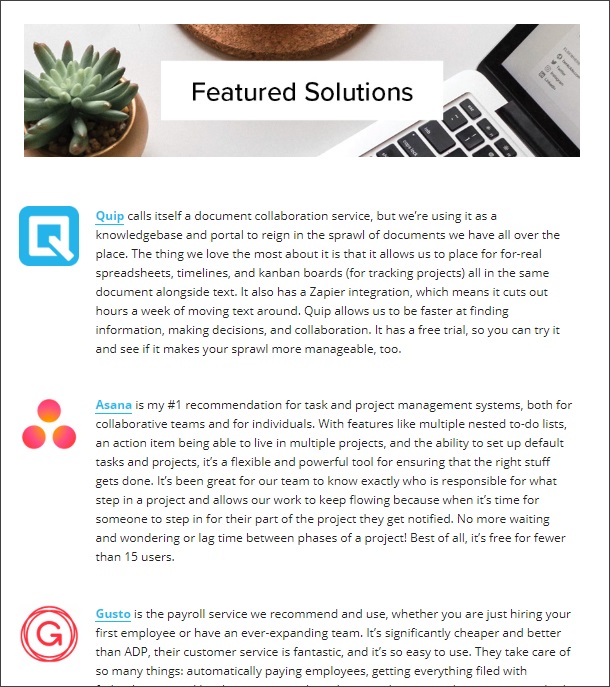
And here’s a more fully featured resources page from Charlie Gilkey’s Productive Flourishing blog:
You aren’t necessarily limited to just a page, either. Some blogs (like Write to Done!) have a “Resources” category of blog posts, where different posts round up different tools or resources.
I think it’s a great idea to create a single dedicated page to list the best resources you know of, though – especially when you’re fairly new to blogging and don’t necessarily have your own products to sell.
[thrive_text_block color=”blue” headline=””]Make Your Blog Pay Today, Not Tomorrow
Get The Complete Blogger’s Guides here [/thrive_text_block]
Why Your Blog Needs a Resources Page
A Resources page can help you to:
- Demonstrate your expertise to your readers. If you know enough about your topic to put together a useful list of great resources, then you know a lot more than most of the people who’re reading your blog!
- Offer something useful and practical for your readers. Your Resources page might be one that readers keep coming back to again and again, whenever they’re looking for inspiration or help.
- Build great relationships with fellow bloggers (or authors, or product creators) in your field. Linking to someone else’s blog, podcast, book, or software from your Resources page is a great vote of confidence in them – plus a great way to bring them new customers.
- Bring in more income. While you don’t have to use affiliate links on your Resources page, if you do include them, you can bring in some steady income. Even a small amount might be enough to cover your hosting costs – and your page could potentially bring in far more than that.
If that all sounds good to you, here’s how to put together your own Resources page for your blog:
How to Create Your Own Resources Page
There’s no one “right” way to create a Resources page for your blog, so please see these as guidelines rather than rules!
#1: Create it as a Page rather than a Post
On your blog, you have two types of content:
- Posts, which have a date and a category, and which go out by email/RSS to readers who’ve signed up for updates.
- Pages, which aren’t dated and don’t have a category, and which don’t go out by email/RSS.
It’s best to create your Resources page as a page, not a post, and link to it from your navigation menu. Of course, you might still want to publish occasional blog posts that list resources (e.g. “The Best Twelve Books On….”) and that’s fine – you can always link to these posts from your Resources page, so they’re easy for new readers to find.
#2: Keep it Simple to Begin With
You could spend months perfecting your draft Resources page, with images or even videos of the various things you’re recommending … but it’s better just to keep it straightforward and get your page online. You can always refine it later.
It’s a good idea to pick a particular format to use consistently for each recommendation: this makes your page look nicely put together, and also makes life easy for you! Here’s one way you could do it:
This structure could easily be repeated for other recommended resources. Note that in each case:
- The title of the resource comes first, in bold; it’s linked to the appropriate webpage.
- The author or creator’s name comes next
- The type of resource is in italics and parentheses
- There’s a one-paragraph description of the resource
#3: Split Your Items into Categories
If you only have a few items, you can just list them with the type of resource indicated (as in the example above). If you’ve got a long list of resources, though, it’s often helpful to split them into categories – each with its own subsection on the page.
For instance, you might have the subheadings:
- Websites
- Books
- Software
- Equipment
… or whatever makes sense for your topic area and for the types of resource you want to recommend.
Another way to split up a long resources list is by theme. For instance, on my blog Aliventures, I cover several different types of writing – freelancing, blogging and fiction-writing. I could split a resources list into these areas to help readers find the resources that are most relevant to them.
#4: Make it Clear if Resources Cost Money
Sometimes, it’s fairly obvious whether a particular resource is free: a blog or podcast will be free to access, whereas a paperback book will cost money.
If there’s likely to be any ambiguity with your resources though, it’s helpful for your readers if you indicate whether a particular resource is free … and if it isn’t, you may want to give an indication of the price. For instance, with the resources above, I could have included the prices like this:
Outlining Your Novel: Map Your Way to Success, K.M. Weiland ($9.79 paperback / $3.99 ebook)
Scrivener, Literature & Latte ($45, software for Mac or PC)
You might want to split your list into free and paid-for resources, or you might want to mix both within the different categories – it’s up to you to decide which makes most sense in the context of your list.
#5: Use Affiliate Links Where Available
An affiliate link is a special URL (link) to a product or service on someone else’s website. When someone visits that site through your special URL, anything they purchase earns you an affiliate fee, as you helped the website to gain that customer.
Affiliates can make anything from a tiny percentage to 100% of a product’s price. You might well get 50% for independently sold digital products, like online courses … and Amazon’s affiliate scheme (Amazon Associates) pays 5% on book sales and 10% on most clothing, shoes and jewellery.
To become an affiliate, you need to sign up for a particular website’s affiliate program, and use the special links that they provide you with.
I know that different bloggers have different views about using affiliate links, and of course if you prefer not to use them at all, that’s fine.
Personally, while affiliate revenue only forms a small part of my income, I think using affiliate links is a great way to bring in some money at no cost to your reader. I only ever use them for products that I wholeheartedly recommend – ones I’ve used and loved myself.
Your Next Steps
Hopefully I’ve inspired you to create your own Resources page!
I know it’s something you might need a bit of time to put together. A great first step is to start jotting down some ideas of things to include:
- What blogs do you enjoy that are relevant to your own topic/niche? (Think about the ones you’ve subscribed to by email, or the ones you keep going back to.)
- What books have you read about the topic?
- Are there any tools / equipment that would be useful to your readers?
Get started on your Resources page this week: it might just be the best thing you do for your blog.

